Archive
GUI Testing Checklist
This GUI test checklist can ensure that all the GUI components are thoroughly tested. In the first part of this checklist, we will cover Windows compliance standard and some test ideas for field specific tests.
Windows Compliance Standards
These compliance standards are followed by almost all the windows based application. Any variance from these standards can result into inconvenience to the user. This compliance must be followed for every application. These compliances can be categorized according to following criteria
Compliance for each application
- Application should be started by double clicking on the icon.
- Loading message should have information about application name, version number, icon etc.
- Main window of application should have same caption as the icon in the program manager.
- Closing of the application should result in “Are you sure?” message.
- Behaviour for starting application more than once must be specified.
- Try to start application while it is loading
- On every application, if application is busy it should show hour glass or some other mechanism to notify user that it is processing.
- Normally F1 button is used for help. If your product has help integrated, it should come by pressing F1 button.
- Minimize and restoring functionality should work properly
- Compliance for each window in the application
- Window caption for every application should have application name and window name. Specially, error messages.
- Title of the window and information should make sense to the user.
- If screen has control menu, use the entire control menu like move, close, resize etc.
- Text present should be checked for spelling and grammar.
- If tab navigation is present, TAB should move focus in forward direction and SHIFT+TAB in backward direction.
- Tab order should be left to right and top to bottom within a group box.
- If focus is present on any control, it should be presented by dotting lines around it.
- User should not be able to select greyed or disabled control. Try this using tab as well as mouse.
- Text should be left justified
- In general, all the operations should have corresponding key board shortcut key for this.
- All tab buttons should have distinct letter for it.
Text boxes
- Move mouse to textbox and it should be changed to insert bar for editable text field and should remain unchanged for non-editable text field.
- Test overflowing textbox by inserting as many characters as you can in the text field. Also test width of the text field by entering all capital W.
- Enter invalid characters, special characters and make sure that there is no abnormality.
- User should be able to select text using Shift + arrow keys.
- Selection should be possible using mouse and double click should select entire text in the text box.
Radio Buttons
- Only one should be selected from the given option.
- User should be able to select any button using mouse or key board
- Arrow key should set/unset the radio buttons.
Check boxes
- User should be able to select any combination of checkboxes
- Clicking mouse on the box should set/unset the checkbox.
- Spacebar should also do the same
Push Buttons
- All buttons except OK/Cancel should have a letter access to them. This is indicated by a letter underlined in the button text. The button should be activated by pressing ALT
- Clicking each button with mouse should activate it and trigger required action.
- Similarly, after giving focus SPACE or RETURN button should also do the same.
- If there is any Cancel button on the screen, pressing Esc should activate it.
Drop down list boxes
- Pressing the arrow should give list of options available to the user. List can be scrollable but user should not be able to type in.
- Pressing Ctrl-F4 should open the list box.
- Pressing a letter should bring the first item in the list starting with the same letter.
- Items should be in alphabetical order in any list.
- Selected item should be displayed on the list.
- There should be only one blank space in the dropdown list.
Combo Box
- Similar to the list mentioned above, but user should be able to enter text in it.
List Boxes
- Should allow single select, either by mouse or arrow keys.
- Pressing any letter should take you to the first element starting with that letter
- If there are view/open button, double clicking on icon should be mapped to these behaviour.
- Make sure that all the data can be seen using scroll bar.
Hope this checklist will help you in testing your GUI components in a better way. In next template, TestingGeek will discuss information about field specific tests and usage of shortcuts in the application GUI.
GUI Testing
GUI Testing
Success of any GUI application depends on how it interacts with user through its user interface, how the user actions are performed to access application’s features and whether application responds in functionally correct manner. An application with incorrect behavior, or invalid user interaction can lead to huge problems. We will try to understand few important aspects with GUI Testing. Following document will help you understand what GUI Testing means, why its required and how you can successfully implement GUI Testing for your UI applications, Desktop applications, .NET applications, windows applications and Java applications using AppPerfect in Automated manner. The important benefits of Automated GUI Testing includes, higher test coverage levels, greater reliability, shorted test cycles, ability to do multi user testing at no extra cost, all resulting in increased levels of confidence in the application and its successful deployment.
What is GUI Testing?
GUI testing is a process to test application’s user interface and to detect if application is functionally correct. GUI testing involves carrying set of tasks and comparing the result of same with the expected output and ability to repeat same set of tasks multiple times with different data input and same level of accuracy. GUI Testing includes how the application handles keyboard and mouse events, how different GUI components like menubars, toolbars, dialogs, buttons, edit fields, list controls, images etc. reacts to user input and whether or not it performs in the desired manner. Implementing GUI testing for your application early in the software development cycle speeds up development, improves quality and reduces risks towards the end of the cycle. GUI Testing can be performed both manually with a human tester or could be performed automatically with use of a software program.
Every software organization tests its softwares, still the end product always have some issues left. Testing team tries their best to find all the bugs before release of the software but still there are issues left in the product and they often re-appear as new modules are added to the software. Even the best of manual testing process struggle to deliver an effective, efficient, accurate and increased test coverage.
Manual testing is often error prone and there are chances of most of the test scenarios left out. Also with the project in development phase where source code changes appear every other day, manually keeping up with the pace to test each and every feature is a difficult task. More often then not the newly added features would bring regression along with them, so to accurately cover all the old test cases manually is very time consuming and error prone.
Automated GUI Testing is use of software program to detect if your desktop application is functionally correct. Automated GUI Testing includes automating manual testing tasks which are mostly time consuming and error prone. Automated GUI Testing is a more accurate, efficient, reliable and cost effective replacement to manual testing. Automated GUI Testing involves carrying set of tasks automatically and comparing the result of same with the expected output and ability to repeat same set of tasks multiple times with different data input and same level of accuracy. Implementing GUI Testing for your application early in the software development cycle speeds up development, improves quality and reduces risks towards the end of the cycle.
Automated GUI Testing is a solution to all the issues raised with Manual GUI Testing. An Automated GUI Testing tool can playback all the recorded set of tasks, compare the results of execution with the expected behavior and report success or failure to the test engineers. Once the GUI tests are created they can easily be repeated for multiple number of times with different data sets and can be extended to cover additional features at a later time.
Most of the software organizations consider GUI Testing as critical to their functional testing process and there are many things which should be considered before selecting an Automated GUI Testing tool. A company can make great strides using functional test automation. The important benefits include, higher test coverage levels, greater reliability, shorted test cycles, ability to do multi user testing at no extra cost, all resulting in increased levels of confidence in the software.
GUI Testing with AppPerfect
AppPerfect offers GUI Testing solution in form of AppPerfect App Test. AppPerfect App Test is found to be most affordable, cost effective, efficient, reliable and accurate solution by its customers. We will now try to understand how you can successfully implement GUI Testing for your desktop application using AppPerfect App Test :
Designing Test Scripts for GUI Testing :
One of the most important aspect in successfully implementing GUI Testing is designing the test cases. Before recording your test scripts you should be ready with the Test Plan for same. You should have the list of modules documented which you would like to test in your application. Once you have figured out the modules to test, pick each module and list down the features to test for that module, Once you have identified the features, design test cases for each of the feature to test. For each of the test case, define the data set with which you will like to parameterize your test case. Also define the validations you will like to perform for your test case.
Once you are ready with the test plan, you can start creating Test Scripts for each of the identified modules.
- Creating new project is an easy one step process. Just start AppPerfect App Test product and select File -> New.. menu option to create a New GUI Testing project. For details on New Project creation refer to Creating a New Project chapter. For details on configuring project properties refer to Setting Project Properties chapter.
- You can now start creating New Groups for each of the feature you have identified in the current module under test. To create a new Group just select Project Node in the Editor tree, and right click and select the option Add Group… from the popup menu. Provide descriptive name for the group clearly stating what feature this group is going to implement.
- AppPerfect supports two kinds of Groups. For Java Applications you can create Java Type Group and for Windows/desktop GUI application you need to create Windows Group. In case of Windows Application Group you need to provide with executable path for your application. In case of Java Group you need to provide Main class, classpath and other environment settings required to start the Java application.
- This way you can functionally structure your test scripts where each test project will represent one functional module for your application and each Group in the Test Project will represent one test case or feature in the module to test. Properly structuring and designing test scripts early in testing cycle will help maintenance process easy over longer run. Properly designing and grouping test cases in different groups will help increase re-usability of groups across different test scripts. In case some of the actions are common and are required to be processed in new test scripts, you can just link or import already existing groups instead of re-recording them all over again in new scripts. For details on Linking / Importing Groups refer to Link Projects chapter.

Easy-to-use Test Recorder helps Automating Tests instantly :
AppPerfect’s GUI Testing tool does not require programming or scripting skills and allows even non-technical and inexperienced testers start automating tests instantly. We provide easy to use Test Recorder which records each event or action as you interact with your application.
- To start recording test just select the Project -> Record Test… menu option. This will launch the Test Recording dialog. select the Group in which you need to record.
- Click on Start Recording button and you are ready to record your test. Test Recorder will take care of launching your application and you are all set to record your test case. Just do the actions you intend to record and Test Recorder will capture all the actions you perform on your Windows or Java application. For details on Test Recording refer to Recording a App Test chapter.

- Once you are done recording, you can browse though the recorded test in Editor view. AppPerfect’s Test Recorder takes care of recording all the steps you performed on your application along with all the windows and images in your desktop application. The recorded test script is object-based, making GUI Testing stable and increases the usability of recorded scripts as your target application evolves / changes. Application simulates recorded actions by finding the elements based on recorded attributes of the element like window’s class, name, text etc. rather than using screen-coordinates. The actual user actions are simulated using Low-level keypress and mouse events.

Component Validation support :
AppPerfect’s GUI Testing tool provide extensive support for validations. Once you are done recording, you can edit your Test cases to perform required Validations. You can add validation for any UI component in recorded test. Select the Validations node in the Project Editor and on right hand side you will find a button to Add Validation…. Click on that and it will launch a wizard to add validation. You can select the required component in Test for which you need to add validation. You can validate the properties of the UI component, like text, value, position. caption, width, height etc.

Extensive support for Parameterization :
Most common requirement in GUI Testing is to perform same set of steps with different input parameters and see if the results are desirable. AppPerfect’s GUI Testing solution supports extensive support for test parameterization, wherein you can run same script over and over again with different data set each time. AppPerfect offers extensive parameter-management. Parameter selection and testing with various parameter values is completely automated. Parameter values are passed either via the event arguments or component attributes. Parameters are stored as name-value pairs, making it intuitive for application developers and testers. Then, depending on the number of iterations for your project, multiple parameter values can be tested, with options to select parameters sequentially or randomly. For more details on Test Parameterization refer to Parameters chapter.
- Select the Parameters Node in the Editor tree and on right hand side you will find button to add a New Test Parameter for your test. This will launch the Parameterization wizard which will help you creating and associating data source in your test. You can choose data source to be Fixed pool of values, Database, records in CSV file or can derive it from calculated values.

- As last step of Parameter Creation Wizard, you can associate Test Parameter with attributes/properties of recorded element or can also associate parameter with arguments in event apis. Say for example in case you need to run test with different input values for set/type events, then you can parameterize the “text” argument for that particular event in this case.

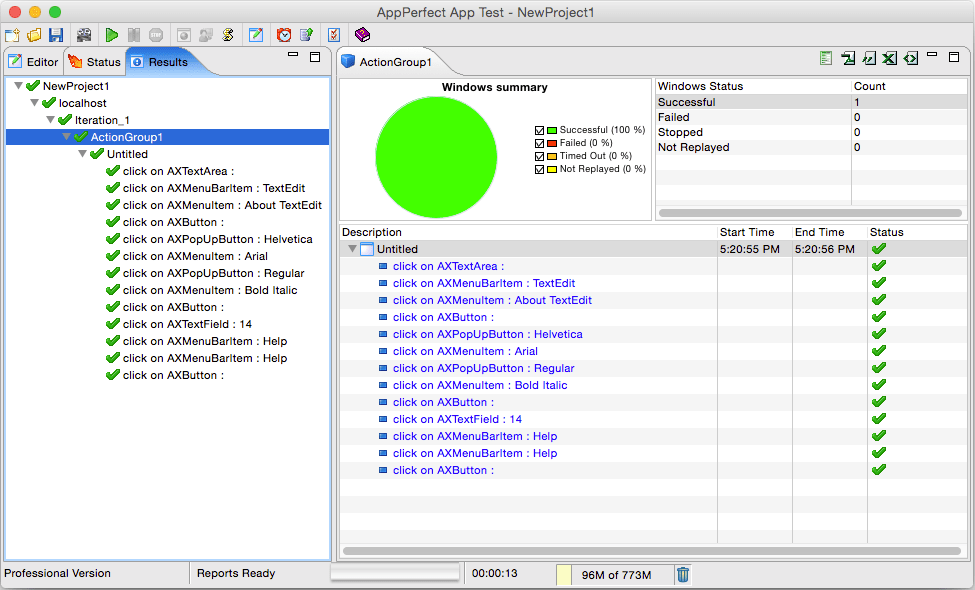
Test Execution with detailed Result Analysis :
Once the test is completely designed you can execute it to functional test your application over and over again as your application evolves to check for any regression or discrepancy in the application since test was recorded. AppPerfect generates extensive reports for each execution step in your test. To replay the test select the Project -> Run..menu option. AppPerfect will launch the application and will start replaying each of the step in your test in automated manner. At the end of test execution you can view the detailed results of each of the execution step and export them to HTML, PDF etc. formats. In case of failure, you can pass on these exported reports to your development team for further analysis. For more details on Test Execution and Results refer to Running a App Test chapter.
GUI Testing can Run Unattended in Automated Manner:
With AppPerfect’s GUI Testing solution you can run complex and lengthy tests unattended. Tests can be scheduled to run overnight and engineers can analyze the results of execution next morning. As a result you save time and improve efficiency and can concentrate on other important tasks while scheduled tests run in background. To schedule tests you require AppPerfect Test Manager product. Once you have Test Manager installed you need to first configure App Test to enable connection to Test Manager server. To configure the Test Manager connection select Tools -> Options -> Server Connections -> Test Manager Settings and provide the host:port information for the machine where Test Manager is installed. Once you have connection configured you can save the App Test Project to Test Manager using File -> Export to Test Manager menu option. Once test is saved to Test Manager you can schedule Test Execution using Tools -> Schedule Project menu option.

For details on creating and executing Test Schedules using Test Manager Web-UI refer to Schedules chapter.
Distributed GUI Testing :
AppPerfect’s GUI Testing solution allows you to distribute your test over multiple machines to simulate real-world conditions while testing network applications, client-server and other multi-tier applications. Testers can easily configure the list of machines on which Test Script should be executed. GUI Testing results from all machines are accumulated into a single report for easier analysis. To configure execution of functional test on multiple machines select Project > Properties menu option. It will launch the Project Properties wizard. Select the “Distributed Testing” step where you can configure to run Test script simultaneously on multiple machines. Distributed testing is performed using App Test service running on the remote machines. Hence, you need to have AppPerfect App Test installed on all the machines where you desire to execute the test. App Test uses HTTP protocol to connect to App Test service on remote machine. To connect to this service, you need to select Protocol (Default is http), provide Host name or IP address of the remote machine, port on which service is listening (Default is 8894) and Context Path (Default is AppService). Normally, you will need to specify only the host name or IP address of remote machine and other fields will take only the default values.
GUI Testing with Team Sharing Support:
Test Engineers can share the Functional test scripts and results with different members in the team. Functional Scripts can be shared with developers which they can use to run after every source change to check for any regression. AppPerfect supports integration with Subversion (SVN) version control system. For details on integration with Subversion server refer to Team Server Configuration chapter.
IDE Integration Support:
IDE Integration is a highly useful feature in AppPerfect products. Once product is integrated in IDE you can start IDE and can execute GUI Testing of your Projects from within IDE. You can integrate AppPerfect applications with Eclipse, IBM Rational Application Developer (RAD), NetBeans, IntelliJ Idea, JBuilder, Oracle JDeveloper and BEA Workshop studio.
Select Tools -> IDE Integration menu option to integrate with any of the supported IDEs. For details on integration with IDE refer to IDE Integration chapter.

Integrate GUI Testing with your Daily Build Process with ANT Script and Command line Support:
AppPerfect supports integration with build process smoothly. You just need to export Functional Test project as ANT Script or Command Line script and then you can execute these exported scripts from your build process. This way you can ensure that each build is functionally tested before final deployment. To Export project as Ant Script select Tools -> Export Project as ANT Script… menu option. For details on ANT script execution refer to ANT Script Execution chapter.

Conclusion :
Its practically impossible for a human tester to repetitively cover all the test cases with same amount of accuracy over and over again. AppPerfect’s GUI Testing Solution has ability to perform complex set of tasks repetitively with same amount of accuracy every time which makes it both cost effective and reliable solution for GUI Testing.
Once a test case is recorded it can be played back multiple times with different data sets. Its possible to validate output with different data inputs using the same test case by parameterizing the user input. Moreover tests once recorded can be reused and extended to cover more features and test cases as your application evolves,
AppPerfect App Test is found to be most affordable, cost effective, efficient, reliable and accurate GUI Testing solution by its customers. In case you have not yet tried AppPerfect App Test, Download Now and give it a try today.
